Build an Open Rack from 1× and 2× Lumber — Let a Tool Handle the Dimensions and Cut List
A simple open rack still requires careful allowances for board thickness, partitions, material counts and cutting layouts. Follow a 1×4/2×4 example through a width change, edge-gluing, L-bracket assembly and safety checks.
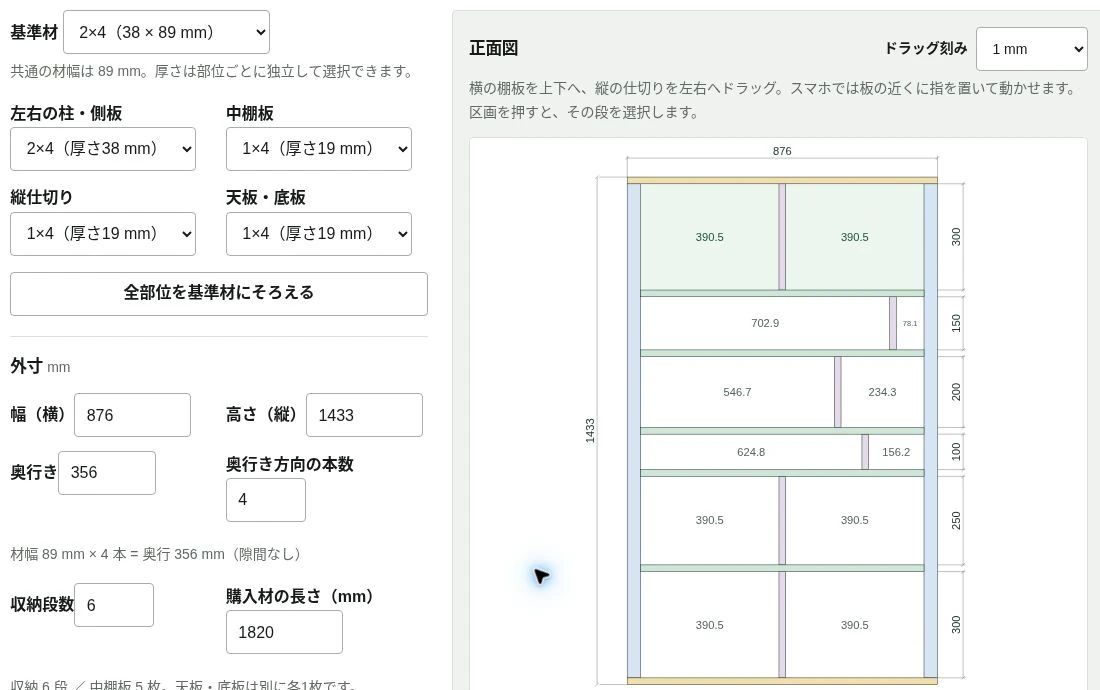
Put boards together and make shelves. The structure sounds simple. But once I start drawing even an open rack like this by hand and collecting the measurements, the work becomes surprisingly tedious.
Subtract board thickness from the overall dimensions. Decide the height of each opening. Allow for the dividers. Count how many strips of the same length must be joined to make the required depth. Then work out how to cut all those pieces from the stock lengths sold at the hardware store.
After doing all that, someone says, “Could we make it a little wider?” Now the dimensions and cutting plan have to be recalculated. Addition and subtraction aren’t difficult. Carrying one design change consistently through the parts list and shopping quantities is the nuisance.
That’s why I built the 1×/2× Open Rack Planner and Cut-List Tool. Edit a dimension or drag a shelf in the diagram, and the parts list and cutting layout update together. The tool interface is currently Japanese, so I include its original control labels where they matter.
This article takes the tool’s “Original example” from standard lumber bought at a hardware store, through cutting and edge-gluing, to a rack assembled with wood glue and metal brackets.
Standard lumber reduces the dimensions you have to decide
Do not simply convert the nominal sizes “1×4” or “2×4” from inches to millimeters. The actual cross-sections used here are:
| Lumber | Actual thickness × width | Used in the original example |
|---|---|---|
| 1×4 | 19 × 89 mm | Top, bottom, intermediate shelves and vertical dividers |
| 2×4 | 38 × 89 mm | Left and right side panels |
These actual dimensions also appear in Heian Shindo’s material-size guide. Check the actual thickness, width and length before buying.
In this design, four 89 mm-wide lengths are placed side by side, then edge-glued into a 356 mm-deep panel. Edge-gluing joins the long edges to make a board wider.
For example, one intermediate shelf uses four 1×4 pieces cut to a length of 800 mm. Together they make a panel 800 mm wide × 356 mm deep × 19 mm thick. We are not joining 800 mm pieces end to end.
Because the stock width remains unchanged, the panel depth is simply 89 × 4 = 356 mm. There is no ripping of boards into narrower strips to obtain, say, a 300 mm panel. The work is reduced to matching lengths and making straight glued joints.
The original example: a six-tier rack 876 mm wide
Open the tool, choose オリジナル例 (Original example) under the preset selector, and click プリセットを読み込む (Load preset). The tool may have automatically saved a previous design; loading the preset restores the exact conditions used here. Selecting its name alone is not enough.
| Setting | Value |
|---|---|
| Outside dimensions | 876 W × 1,433 H × 356 D mm |
| Storage openings | 6 tiers, with 5 intermediate shelves |
| Vertical partitions | One per tier; 6 in total |
| Reference stock and side panels | 2×4 |
| Top, bottom, middle shelves, dividers | 1×4 |
| Strips joined across the depth | 4 |
| Purchased stock length | 1,820 mm |
| Saw kerf allowance | 2 mm per cut |
The top and bottom panels cover the ends of the two side panels. The intermediate shelves fit between the sides, and each tier has its own divider.
Thus “horizontal boards” do not all have the same cut length:
- Top and bottom: the full outside width, 876 mm.
- Intermediate shelves: outside width minus the thickness of both 2×4 sides,
876 − 38 × 2 = 800 mm. - Side panels: outside height minus both 1×4 end panels,
1,433 − 19 × 2 = 1,395 mm.
The opening heights aren’t obtained by dividing the outside height by six. From top to bottom the example uses 300, 150, 200, 100, 250 and 300 mm, totaling 1,300 mm. Add the thickness of the top, bottom and five intermediate shelves, 19 × 7 = 133 mm, to reach the full 1,433 mm.
| Tier from top | Opening height | Left compartment | Right compartment |
|---|---|---|---|
| 1 | 300 mm | 390.5 mm | 390.5 mm |
| 2 | 150 mm | 702.9 mm | 78.1 mm |
| 3 | 200 mm | 546.7 mm | 234.3 mm |
| 4 | 100 mm | 624.8 mm | 156.2 mm |
| 5 | 250 mm | 390.5 mm | 390.5 mm |
| 6 | 300 mm | 390.5 mm | 390.5 mm |
The initial horizontal positions of the partitions are estimates based on the reference drawing, not compulsory dimensions. Move them to suit what you will store. The tool calculates to 0.1 mm, but that does not mean the wood or woodworking accuracy will be within 0.1 mm.
Move a shelf, and its neighboring opening changes
Drag a horizontal shelf up or down in the front view: the heights of the two adjacent openings change while the outside height remains fixed. Move a vertical divider left or right: the adjacent compartment widths change, but the total width stays the same. For precise values, use the numeric input fields.
On the other hand, 各段の内寸高さを一括入力 (Enter all opening heights together) sets the overall height to match the specified openings plus the boards. Which behavior you want depends on whether the installation space or the stored objects determine the design.
Widen the rack by 24 mm, and the cutting layout changes too
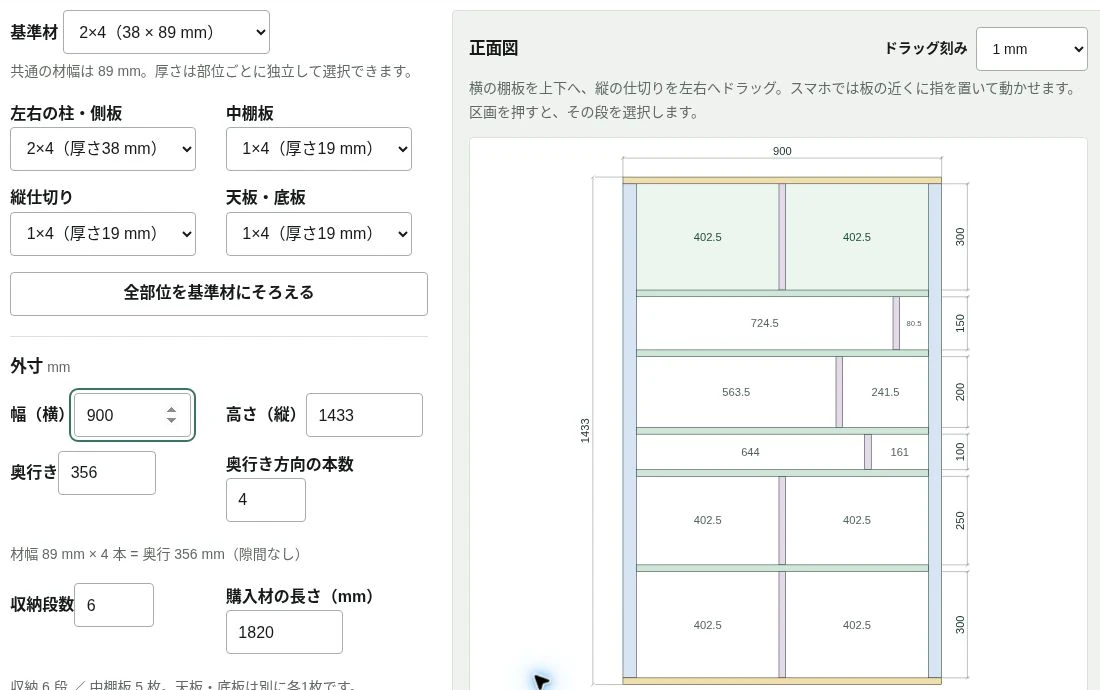
Suppose 900 mm fits the room better than 876 mm. Change just 幅(横) (Width) in the outside dimensions to 900. With everything else held constant, the tool recalculates:
| Item | Width 876 mm | Width 900 mm |
|---|---|---|
| Top/bottom cut length | 876 mm | 900 mm |
| Intermediate shelf cut length | 800 mm | 824 mm |
| Side panel cut length | 1,395 mm | 1,395 mm |
| Left/right widths at top | 390.5 mm each | 402.5 mm each |
| 1×4 stock pieces to buy | 16 | 17 |
| 2×4 stock pieces to buy | 8 | 8 |
| Total stock pieces | 24 | 25 |
These purchase counts come from the tool’s cutting layout using 1,820 mm stock and a 2 mm kerf. The result is a proposed layout, not a guarantee of the mathematical minimum stock count.
In the original cut plan, some 1×4 stock is divided into lengths of 800 + 800 + 200 mm. Including a total 6 mm cutting allowance gives 1,806 mm, which fits into 1,820 mm stock.
Lengthen the shelves to 824 mm but try the same combination, and you get 824 + 824 + 200 + 6 = 1,854 mm. It no longer fits.
Changing “800” to “824” on a drawing is not enough if the purchased lumber can no longer yield those parts. This is exactly why I wanted the drawing, parts list and cut plan connected.
For the rest of the material list and assembly, return to the original 876 mm example. Use 元に戻す (Undo) or reload オリジナル例.
Confirm your parts and shopping quantities before cutting
Group the original example’s parts by cut length. “Pieces cut” counts individual strips before gluing, while “Panels made” counts the wider panels made by edge-gluing four strips.
| Purpose | Stock | Cut length | Pieces cut | Panels made |
|---|---|---|---|---|
| Top and bottom | 1×4 | 876 mm | 8 | 2 |
| Left and right sides | 2×4 | 1,395 mm | 8 | 2 |
| Intermediate shelves | 1×4 | 800 mm | 20 | 5 |
| Tier 1 and 6 dividers | 1×4 | 300 mm | 8 | 2 |
| Tier 2 divider | 1×4 | 150 mm | 4 | 1 |
| Tier 3 divider | 1×4 | 200 mm | 4 | 1 |
| Tier 4 divider | 1×4 | 100 mm | 4 | 1 |
| Tier 5 divider | 1×4 | 250 mm | 4 | 1 |
| Total | 60 | 15 |
According to this cutting layout, the purchase requirement is 16 lengths of 1×4 plus 8 lengths of 2×4, each 1,820 mm long. The plan places top, shelf and divider cuts together on stock of the same type, rather than optimizing each category separately.
Check the count under 必要な材料と木取り (Materials and cut layout), and open 木取り図のプレビュー (Cut-plan preview). Before working, use 設計図・木取り図を印刷/PDF (Print drawings and cut plan / PDF) to keep dimensions and part numbers at hand. You can save the parts list as CSV, and 設計データを保存 (Save design data) retains the editable design as JSON.
Before ordering lumber, check both the real stock length and actual saw kerf. The tool assumes a fixed 2 mm per cut. It does not include extra length for trimming rough ends or avoiding knots and splits. Some of the original cuts leave only 6 mm spare. If a shop’s cutting service uses a different blade width or process, do not order directly from the 2 mm layout without recalculating.
Edge-glue four strips to make one panel
Prepare the lumber, wood glue, clamps, cauls or protective blocks, a measuring tape, try square, pencil and sandpaper. If cutting yourself, add a saw and a stable workbench. Check the cut lengths even if the store did the cutting.
1. Cut, label, and group four matching strips
Write the part number from the plan on each cut piece: C1 for the top, C2 for the bottom, H1–H5 for the intermediate shelves, for example. Grouping the four strips for each panel helps avoid mixing divider lengths.
Before applying glue, lay out the four strips on a flat surface. Align the ends and check that the long edges can meet without force. If a strip needs excessive clamping to flatten it or leaves a large gap along the joint, change the combination or replace it.
2. Prepare the mating edges and apply glue
Remove dust and dirt from the mating faces and dry-fit the bare wood. Do not apply finish to glue surfaces. Spread wood glue evenly and follow the adhesive manufacturer’s application directions.
The joint runs along each strip’s long grain, not end grain. Even when stock has rounded edges, the remaining flat mating faces must make adequate contact. If you plane off some width to improve the joints, four strips will no longer total exactly 356 mm. The tool assumes the original 89 mm width, so account for that change separately.
3. Clamp and allow the adhesive to cure
Use protective blocks to keep the strips from stepping up or bowing. Check alignment and overall flatness before tightening the clamps. Follow the product’s specified clamping and curing times. A surface that feels dry is not proof the joint can carry assembly loads yet.
Repeat the process to make 2 end panels, 2 side panels, 5 intermediate shelves and 6 dividers. If you have too few clamps, glue the panels in several batches.
Dry-fit the panels, then assemble with glue and brackets
The finished panels are also joined with wood glue. Use both glue and L-shaped metal brackets where the top, bottom and intermediate shelves meet the sides. The planner’s original example counts these brackets by default.
You will also need correctly sized brackets and screws, a screwdriver and a drill for pilot holes where required.
- Dry-fit the cured panels on a flat surface. Confirm that the bottom sits beneath the two side panels, the top caps them, and the intermediate shelves fit between them.
- Mark shelf positions inside the side panels from a common reference. Use a square to check perpendicularity, and compare opening heights and divider positions with the plan.
- Disassemble the trial fit, glue the joining faces, reassemble and hold them temporarily. Install L-brackets on both sides of each shelf. Check opening heights, squareness and the overall diagonals as you go.
- Divider ends also involve end-grain joints. Decide on a suitable fixing method before assembly; align, glue and secure them accordingly. A default bracket quantity of zero for dividers is only a quantity setting, not an indication that dividers need no fastening. If brackets are needed, update their counts under 縦仕切り (Vertical dividers).
- After the glue has cured, smooth splinters and sharp edges and apply finish if desired. Check for rocking, gaps and protruding screws before use.
The default count is 28 L-brackets: 2 on each side of the top, bottom and 5 intermediate shelves, or 7 × 2 × 2. If each bracket uses two screws, the plan calls for 56 bracket screws. These counts apply to the 15 assembled panels, not to each of the four strips from which a panel is glued.
The plan does not select bracket dimensions, screw diameter or screw length. Choose fasteners suitable for the wood and metal, avoiding screws that protrude through a 19 mm shelf. Additional reinforcement, spare screws and anti-tip hardware are not included in the 56.
This example assumes a dry indoor location. Secure the rack against tipping using fixings suited to the wall structure. If lateral sway remains, add suitable back bracing or a back panel. The tool estimates dimensions and quantities; it does not certify the finished rack’s load capacity.
You can choose wider stock to reduce fabrication work
The original design joins four 1×4 or 2×4 strips for each panel. If you would rather avoid edge-gluing, try the 小・中・大 (Small / Medium / Large) presets. They use 1×12 and 2×12 stock with an actual width of 286 mm as the panel depth, without gluing strips together.
Choose what fits the available lumber, desired depth and tools. Make the rack a little lower, shift a divider or adjust a tier to fit your belongings; the parts and purchase quantities follow those changes.
The whole point is to make a rack, not to spend the day rewriting dimension tables. Enjoy choosing the shape yourself, and leave the repetitive recalculation to the Open Rack Planner and Cut-List Tool.